Webready Help Center Webready Help Center
  • Getting Started
    • How to create a Webready website
    • Understanding Webready Pricing
    • Webready Setup Checklist
    • Webready FAQ
  • Domains
    • Keeping the Free Webready URL
    • Assigning a Domain to your Webready website
    • About Domains
    • Configuring DNS to Point your Domain to Webready
    • Removing a Domain from Your Webready Account
    • Unassigning a Domain from Your Site
    • Securing your domain with an SSL certificate
    • Connecting Your Own Domain Name
    • Adding a Webready Domain
  • Accepting Payments
    • Payment Gateway
    • Payment Rules
    • Accepting Payment On Your Website
  • Managing your Website
    • How do I prevent spam from my website forms?
    • How do I keep track of my bandwidth?
    • How is my bandwidth calculated?
    • About your Website's Storage and Bandwidth
    • How to help my website get listed on Google
    • Exceeding Your Site's Bandwidth Limit
    • Why doesn't my bandwidth match Google Analytics?
  • Webready Editor
    • Booking Settings
      • Booking Form Presets
      • Booking Form Settings - Upsells Tab
      • Booking Form Settings - Discount Codes Tab
      • Booking Form Settings Overview
      • Booking Form Settings - Sidebar Tab
      • Booking Form Settings - Layout Tab
      • Booking Form Settings - Style Tab
    • Editor V2
      • Featured rentals and Custom rentals list feature (Editor V2)
      • How do I add or adjust my image logo?
      • Allow Gap Night Setting
      • How do I redirect my pages? (Editor V2)
      • How to use the Website Editor V2
      • Adding Custom Code to your Website
      • Global Settings Overview
      • Contact Form Settings
      • How do I set up a Cookie Policy on my website?
      • How do I add a telephone number to my forms and booking page? (Editor V2)
      • How Do I Access the Webready Editor V2?
      • How to create a text logo for my website?
      • How Do I Add Password Protection to my Website or Webpage?
      • Creating a Custom Page
    • Featured rentals and Custom rentals list feature
    • How do I add a telephone number to my forms and booking page?
    • How do I redirect my pages?
    • How Do I Block Dates from Check-in or Check-out?
    • How to use the Website Editor
  • Reports
    • Margins Custom Report Views
    • Reports Overview
  • eDocuments
    • Automations
      • eDocuments Automations
    • Inbox
      • eDocuments Inbox
      • eDocuments Photo Identification
    • Templates
      • eDocuments Documents
      • Cancel A Pending Signature Template
      • eDocuments Contracts
      • eDocuments Custom Codes
      • eDocuments Templates
      • Share an eDocuments Template
      • Send an eDocuments Template
      • Create A New eDocuments Custom Code
      • eDocuments Forms
      • eDocuments Data Dictionary
      • Create A New eDocument Tag
    • eDocuments Overview
    • eDocuments FAQ
  • Settings & Configurations
    • User Settings & Logins
      • How Do I Add Users?
    • Using Webready in Multiple languages
    • How Do I Add a Chat Box to my Website?
  • Rates
    • What is a Base rate?
    • How do I add a Discount Code?
    • What is a Dynamic Rate?
    • LOS (Length of Stay) Discounts
    • Rate Types in Webready
    • What is a Standard Rate?
  • Integrations
    • Webready Integration with Beds24
    • Webready integration with Pricelabs
    • Webready Integration with Hostaway
    • Webready integration with RentalWise
    • Webready Integration with Hospitable
    • Webready integration with Google's Vacation Rental platform
    • Google Vacation Rentals FAQs
    • Webready Integration with Booking Automation
    • Webready integration with OwnerRez
    • Webready integration with FantasticStay
    • Webready integration with Zeevou
    • Webready integration with Lodgify
    • Webready Integration with Wheelhouse
    • Webready Integration with Uplisting
    • Webready integration with Channex
  • Airbnb
    • Connecting to Airbnb
    • How do I refresh my Airbnb property list?
    • How to Rank Higher on AirBnB
    • Airbnb Connector FAQ
    • Co-hosting with Airbnb
    • Requirements for an Airbnb Rental
    • Airbnb Connector Overview
  • Automation
    • Webready Automations Overview
    • Data Dictionary
    • Automation Templates
    • HTTP Webhook Triggers
  • Rentals
    • Linking Rentals Together
    • How do I delete rentals?
    • Auto sync rental changes
    • Syncing your rentals manually
    • How do I add booking fees to my rental?
    • Manually adding your Rentals
    • Uploading Rentals from a CSV
    • How do I create Rentals?
  • Upsells
    • How Do I Display Upsells on my Website?
    • Upsells Overview
    • How Do I Create a Sale?
    • Upsells Reports
    • How to create an invoice for my upsells?
    • How Do I Create an Upsell?
  • Images
    • How do I add Images?
  • Webready Translator
    • Webready Translator: Translations
    • Webready Translator Overview
    • Webready Translator: Formats
    • Webready Translator: Languages
  • Invoices & Billing
    • Invoice Management
      • How to create Invoice templates?
      • Invoicing & Payments
      • How Do I Make Changes to an Invoice?
      • Scheduling Invoices
      • How to set up Invoice Rules?
      • Creating Credit Notes
      • How Do I Request a Partial Payment or Deposit Payment?
      • How Do I Charge a Guest for Multiple Items on an Invoice?
    • Payment Gateways
      • How Do I Accept Payments Online and Via Credit Card?
  • Managing your Account
    • How Do I Add or Remove My Credit Card?
    • Account Info Overview
  • App Store
    • App Store Billing & Subscriptions
    • App Store Overview
    • App Store FAQs
  • Messages
    • Messages: Spam
    • Messages Overview
    • Messages: Email Notifications
    • Messages: Inbox
    • Messages: Spam Filters
    • Messages: Templates
  • Webready Bookings
    • Webready Calendars Walkthrough
    • Creating Hold Events in Webready
    • Creating a Manual Booking
    • How Do I Delete an Inquiry?
    • How Do I Edit Bookings?
    • Creating a Website Booking Link
    • Importing an External Calendar
    • How do I view my messages?
    • Webready Booking List
    • Making Reservations for Individual Bedrooms
Webready Translator / Webready Translator: Languages /
Website Login

Webready Translator: Languages


The Webready Translator Languages section allows you to enable multi-language on the website, add your languages and their flags, as well as to allow the visitor language to be detected.

To translate your website into different languages, you will need to subscribe to the Website Translator add on in the App Store.

Enabling and adjusting Languages

  • Navigate to Language Settings.

    To access the Webready Translator feature, open the Webready Editor, scroll through the left pane and click on the Language Settings icon:

    • Click on the Languages tab on the left.

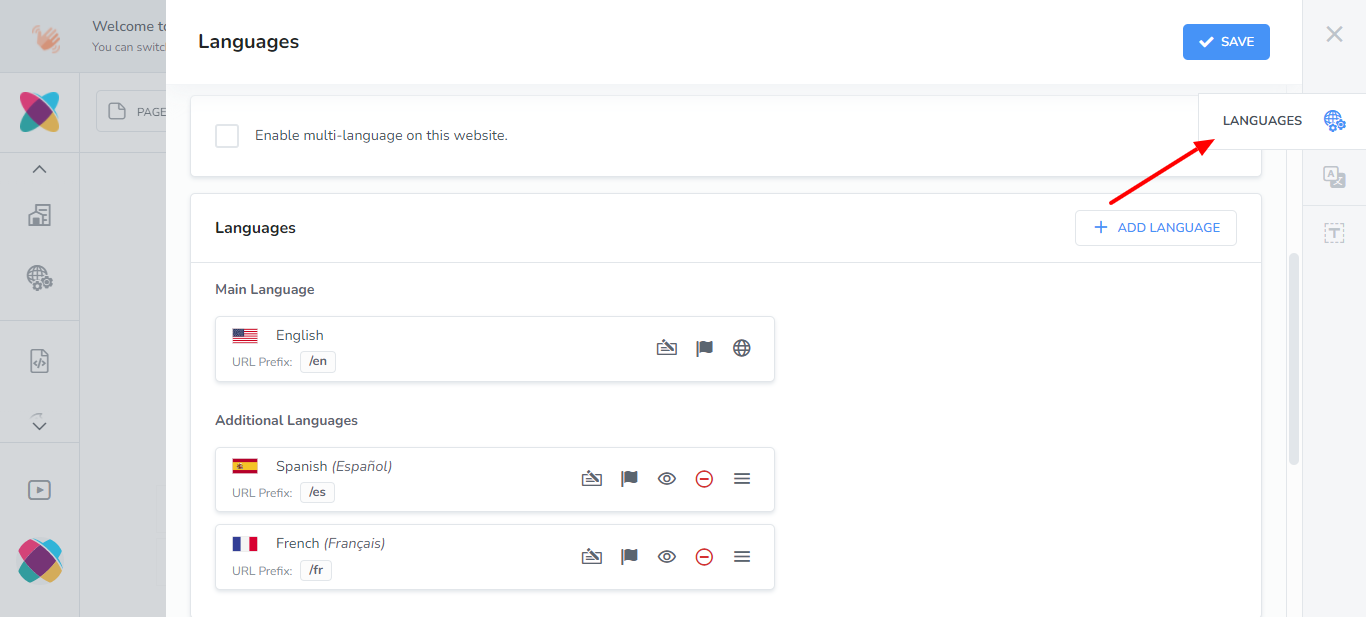
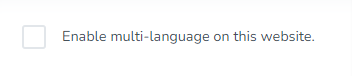
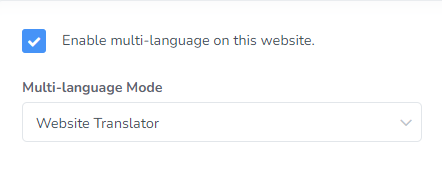
    • Click "Enable multi-language on this website".

    • Website Translator should be selected here.
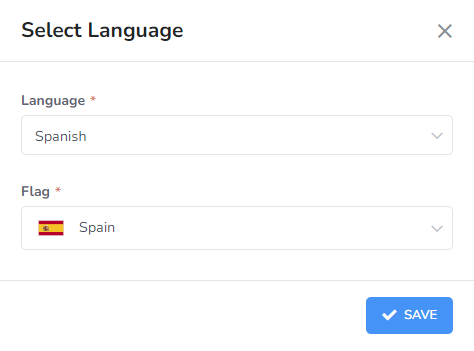
    • Click Add Language
      You can add as many languages as are available to translate.

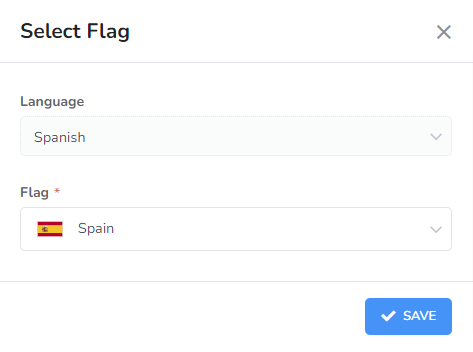
    • Choose the language and one of the available flag options for that language.

You will see a list of your languages displayed, with action options available:

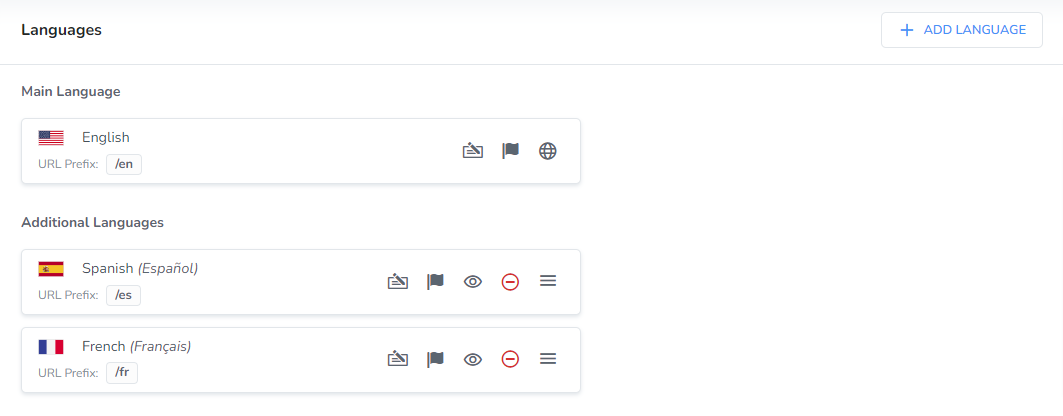
Here are a list of the options available for the languages:

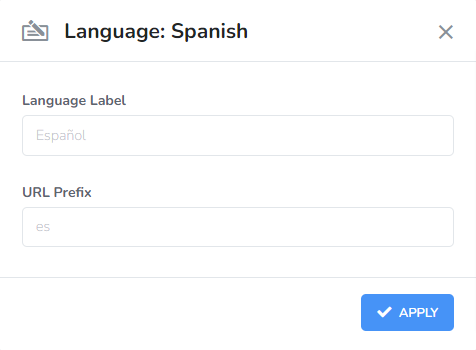
> Edit Language Information:

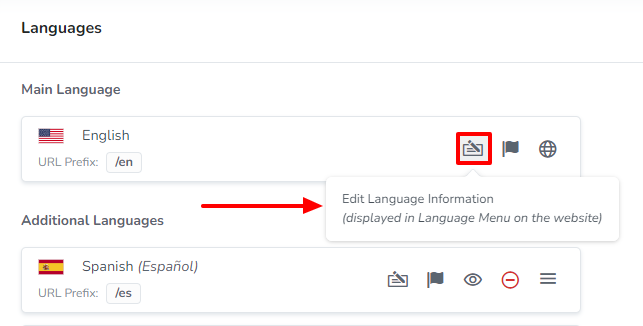
Here, you will be able to change the language label and URL Prefix. The URL prefix will be displayed in the browser to differentiate between the versions of the website.

> Change Flag:

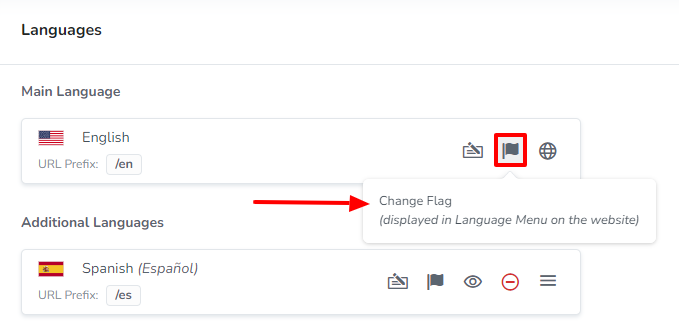
You will be able to change the default flag for the language to a different available flag by choosing one from the dropdown box.

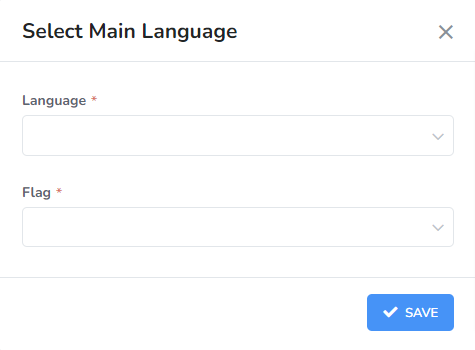
> Change Main Language:

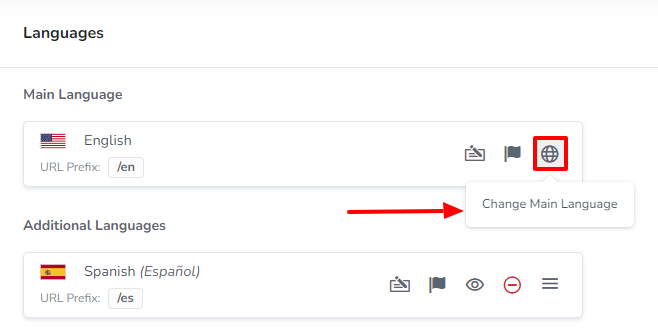
If you need to switch your main language, then this can easily by done here.

> Disable Language:

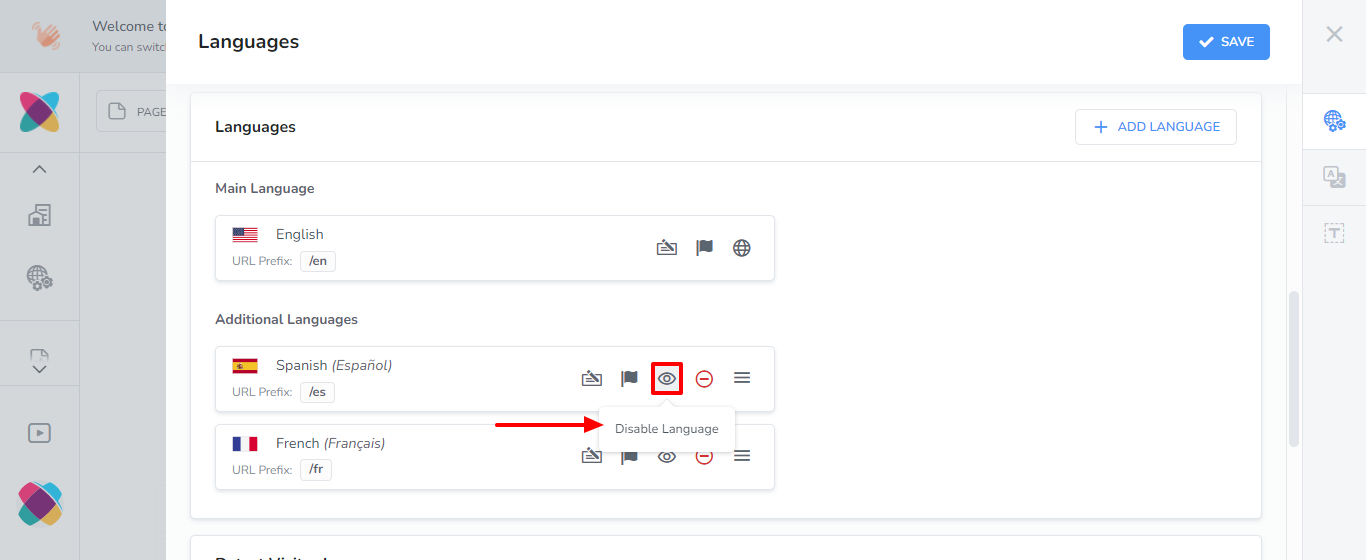
If you will no longer like the website for a particular language to be displayed, you can use this option and disable the language.

> Delete Language:

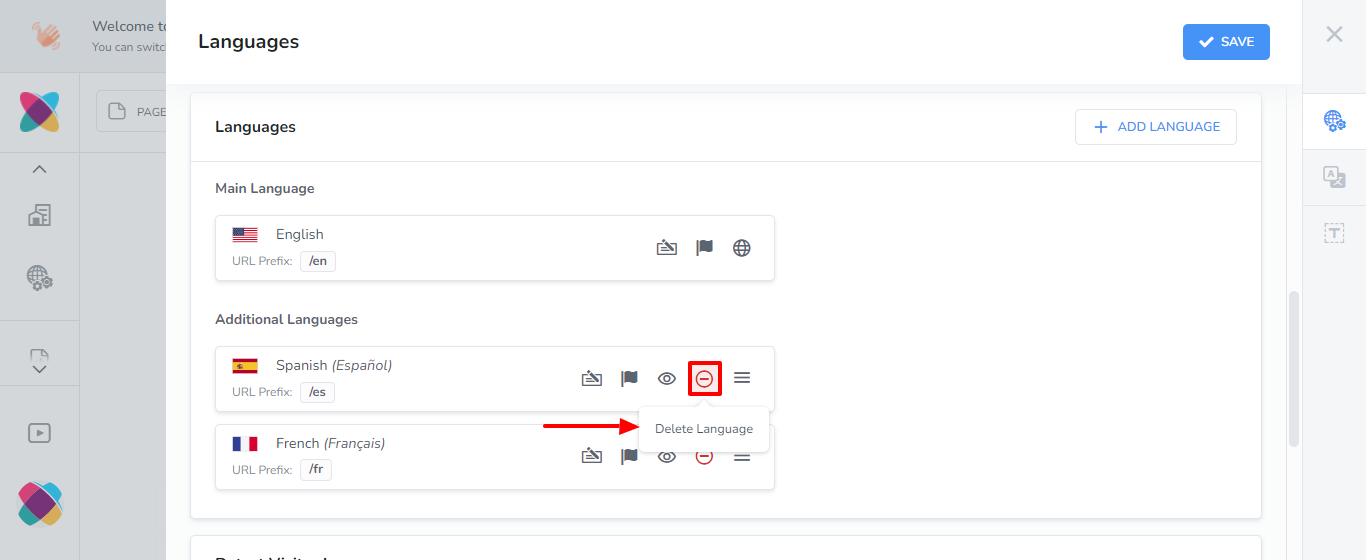
Use this option to completely remove a language from your website.

> Re-order:

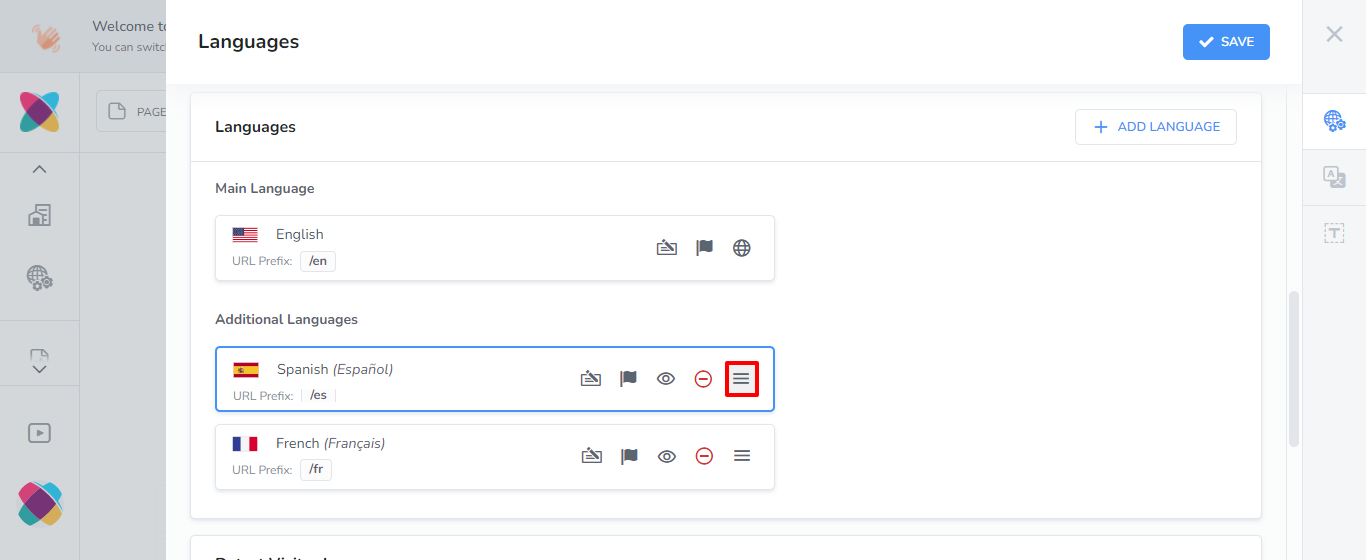
The additional languages will have the option to click and move them so you can re-order your languages.

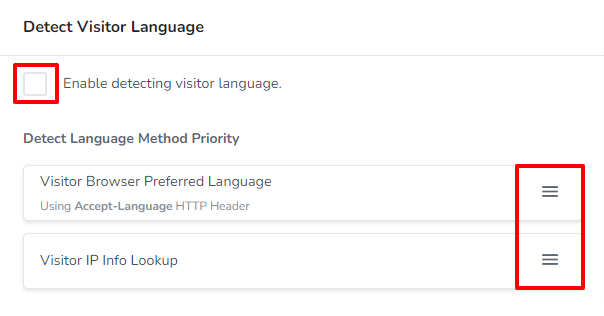
Detect Visitor Language

If you will like the language of your website viewer to be automatically detected, you can enable that option in this section.

The language will be detected based on their Browser Preferred Language or based on their IP Info Lookup.

You can use the re-order icons at the left of each method to change the priority for which the language is detected.

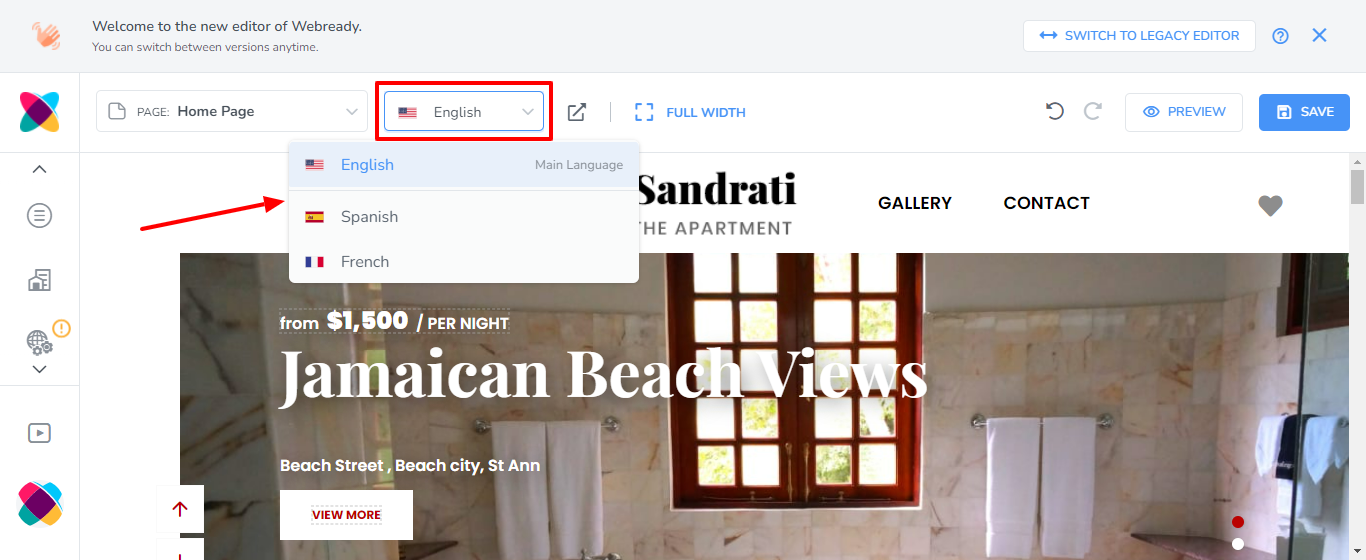
Viewing your website in your additional languages

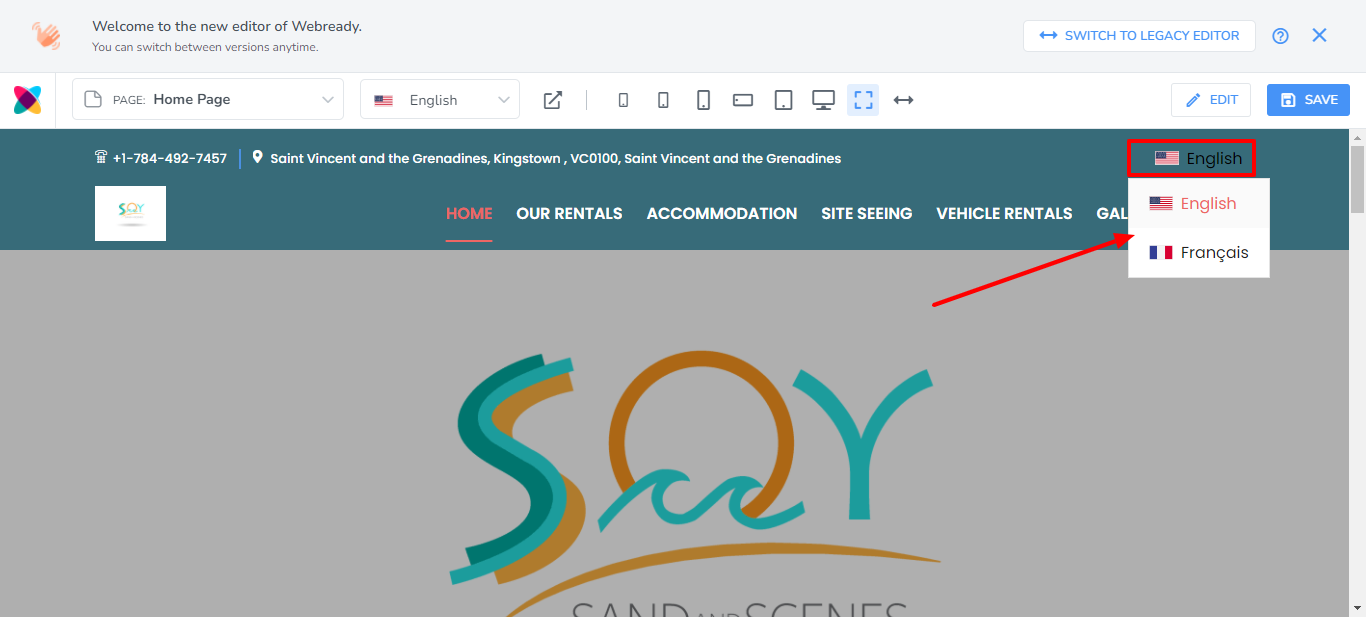
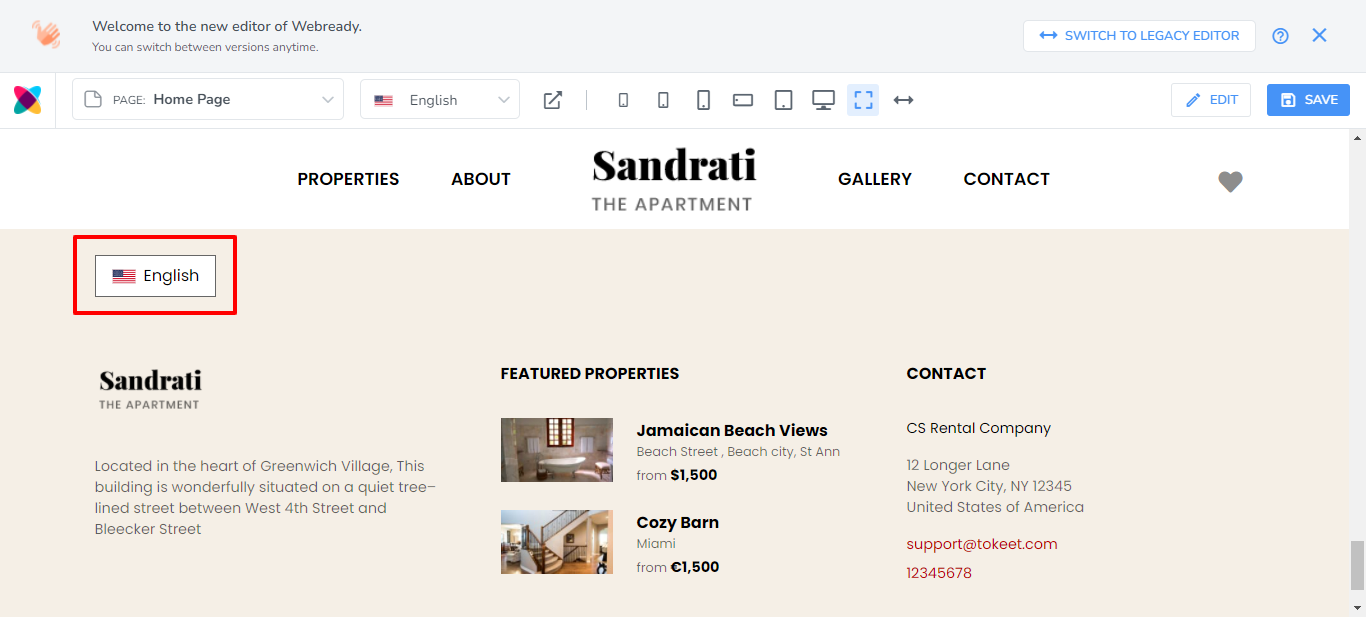
Once you have enabled multi-language on your website, you will see a dropdown of your languages in the Editor.

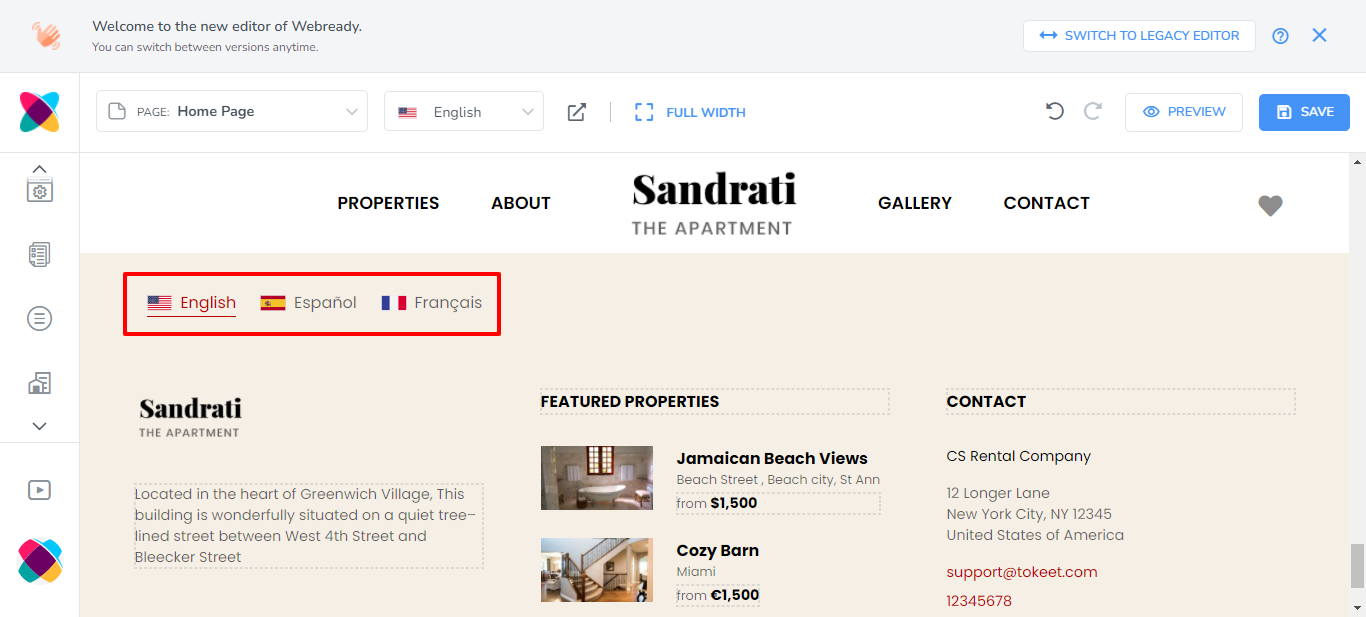
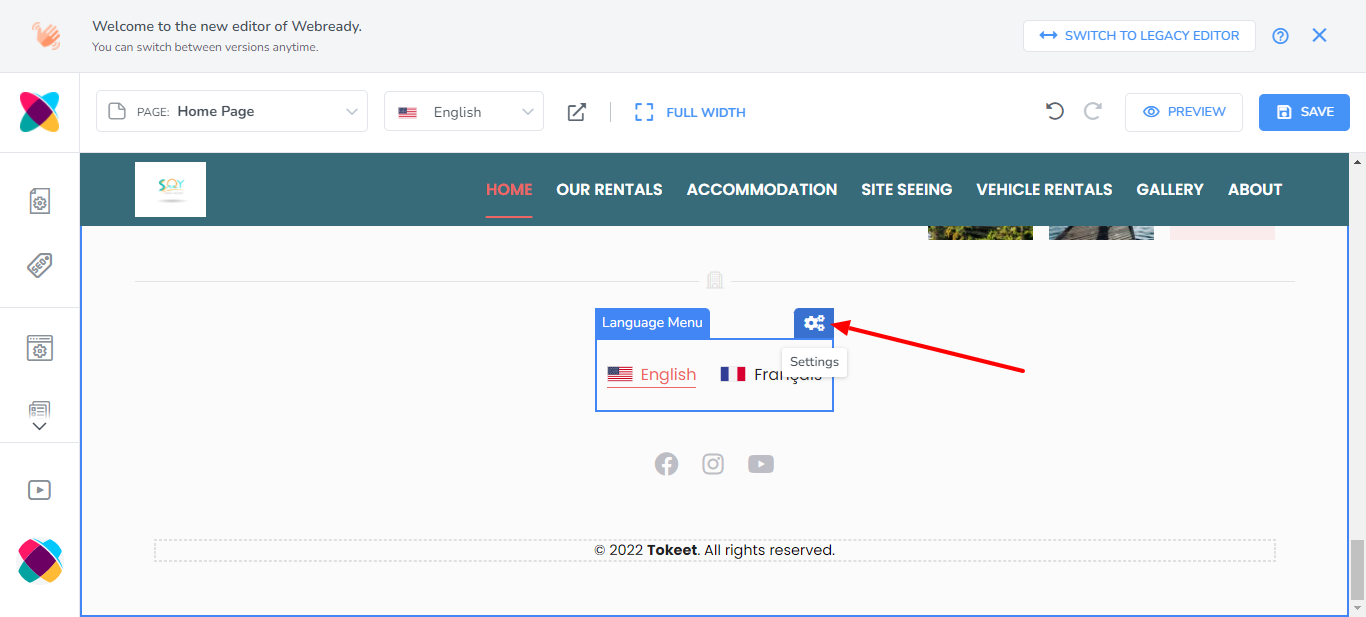
On your live website, the language options will be displayed in the footer. For some templates such as Pearl, you will also see the options listed in the Navigation menu.

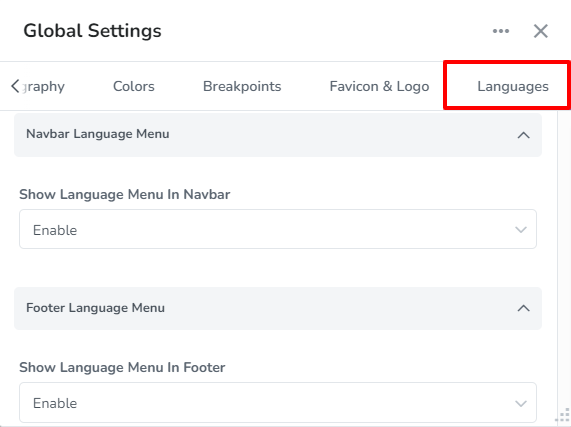
There will also be options available in the Global Settings in a Languages tab to allow you to enable or disable if the language options are displayed and how they should be shown.

Language options in Navigation menu:

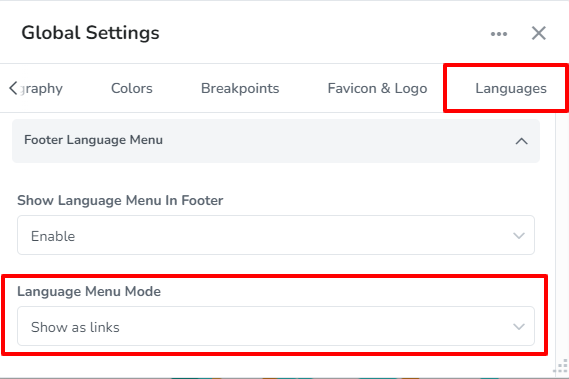
The footer options in global settings allow you to display the languages as links or as a menu.

Footer language options shown as links:

Footer language options shown as a menu:

Adjusting the Language settings displayed on the website

Whether your language options are displayed in the footer only or in the footer and the navigation menu, you will have settings that can be adjusted. Simply click on the Settings icon:

You will be able to adjust the order that the languages are displayed, whether to show the flag or not, or if to show the language label or the language code/prefix.

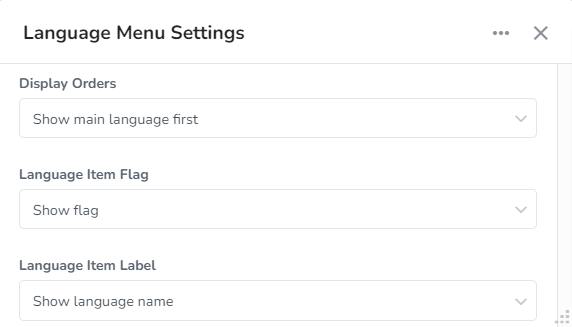
Display Order - Choose to "Show main language first", "Show active language first" or "Sort by alphabetical order".

Language Item Flag - Select either "Show flag" or "Don't show flag".

Language Item Label - You can choose either "Show language name" or "Show language code/prefix".

If you or your website viewer chooses a language besides the main language, then the site will be displayed showing the translations that you added for the website.

The website url will include the language prefix that was set for each additional language.

e.g. if the Spanish version of your website has a language prefix of "es" and the url for the main language is "www.mywebsite.com" the Spanish version will be "www.mywebsite.com/es"

Be sure to Republish your website once you have enabled and configured multi-languages on your website.
How did we do? Thank you! We appreciate your feedback.
Website Login
Copyright © 2025 Webready. All Rights Reserved.
No documents match your search.
Searching...