Webready Help Center Webready Help Center
  • Getting Started
    • How to create a Webready website
    • Understanding Webready Pricing
    • Webready Setup Checklist
    • Webready FAQ
  • Domains
    • Keeping the Free Webready URL
    • Assigning a Domain to your Webready website
    • About Domains
    • Configuring DNS to Point your Domain to Webready
    • Removing a Domain from Your Webready Account
    • Unassigning a Domain from Your Site
    • Securing your domain with an SSL certificate
    • Connecting Your Own Domain Name
    • Adding a Webready Domain
  • Accepting Payments
    • Payment Gateway
    • Payment Rules
    • Accepting Payment On Your Website
  • Managing your Website
    • How do I prevent spam from my website forms?
    • How do I keep track of my bandwidth?
    • How is my bandwidth calculated?
    • About your Website's Storage and Bandwidth
    • How to help my website get listed on Google
    • Exceeding Your Site's Bandwidth Limit
    • Why doesn't my bandwidth match Google Analytics?
  • Webready Editor
    • Booking Settings
      • Booking Form Presets
      • Booking Form Settings - Upsells Tab
      • Booking Form Settings - Discount Codes Tab
      • Booking Form Settings Overview
      • Booking Form Settings - Sidebar Tab
      • Booking Form Settings - Layout Tab
      • Booking Form Settings - Style Tab
    • Editor V2
      • Featured rentals and Custom rentals list feature (Editor V2)
      • How do I add or adjust my image logo?
      • Allow Gap Night Setting
      • How do I redirect my pages? (Editor V2)
      • How to use the Website Editor V2
      • Adding Custom Code to your Website
      • Global Settings Overview
      • Contact Form Settings
      • How do I set up a Cookie Policy on my website?
      • How do I add a telephone number to my forms and booking page? (Editor V2)
      • How Do I Access the Webready Editor V2?
      • How to create a text logo for my website?
      • How Do I Add Password Protection to my Website or Webpage?
      • Creating a Custom Page
    • Featured rentals and Custom rentals list feature
    • How do I add a telephone number to my forms and booking page?
    • How do I redirect my pages?
    • How Do I Block Dates from Check-in or Check-out?
    • How to use the Website Editor
  • Reports
    • Margins Custom Report Views
    • Reports Overview
  • eDocuments
    • Automations
      • eDocuments Automations
    • Inbox
      • eDocuments Inbox
      • eDocuments Photo Identification
    • Templates
      • eDocuments Documents
      • Cancel A Pending Signature Template
      • eDocuments Contracts
      • eDocuments Custom Codes
      • eDocuments Templates
      • Share an eDocuments Template
      • Send an eDocuments Template
      • Create A New eDocuments Custom Code
      • eDocuments Forms
      • eDocuments Data Dictionary
      • Create A New eDocument Tag
    • eDocuments Overview
    • eDocuments FAQ
  • Settings & Configurations
    • User Settings & Logins
      • How Do I Add Users?
    • Using Webready in Multiple languages
    • How Do I Add a Chat Box to my Website?
  • Rates
    • What is a Base rate?
    • How do I add a Discount Code?
    • What is a Dynamic Rate?
    • LOS (Length of Stay) Discounts
    • Rate Types in Webready
    • What is a Standard Rate?
  • Integrations
    • Webready Integration with Beds24
    • Webready integration with Pricelabs
    • Webready Integration with Hostaway
    • Webready integration with RentalWise
    • Webready Integration with Hospitable
    • Webready integration with Google's Vacation Rental platform
    • Google Vacation Rentals FAQs
    • Webready Integration with Booking Automation
    • Webready integration with OwnerRez
    • Webready integration with FantasticStay
    • Webready integration with Zeevou
    • Webready integration with Lodgify
    • Webready Integration with Wheelhouse
    • Webready Integration with Uplisting
    • Webready integration with Channex
  • Airbnb
    • Connecting to Airbnb
    • How do I refresh my Airbnb property list?
    • How to Rank Higher on AirBnB
    • Airbnb Connector FAQ
    • Co-hosting with Airbnb
    • Requirements for an Airbnb Rental
    • Airbnb Connector Overview
  • Automation
    • Webready Automations Overview
    • Data Dictionary
    • Automation Templates
    • HTTP Webhook Triggers
  • Rentals
    • Linking Rentals Together
    • How do I delete rentals?
    • Auto sync rental changes
    • Syncing your rentals manually
    • How do I add booking fees to my rental?
    • Manually adding your Rentals
    • Uploading Rentals from a CSV
    • How do I create Rentals?
  • Upsells
    • How Do I Display Upsells on my Website?
    • Upsells Overview
    • How Do I Create a Sale?
    • Upsells Reports
    • How to create an invoice for my upsells?
    • How Do I Create an Upsell?
  • Images
    • How do I add Images?
  • Webready Translator
    • Webready Translator: Translations
    • Webready Translator Overview
    • Webready Translator: Formats
    • Webready Translator: Languages
  • Invoices & Billing
    • Invoice Management
      • How to create Invoice templates?
      • Invoicing & Payments
      • How Do I Make Changes to an Invoice?
      • Scheduling Invoices
      • How to set up Invoice Rules?
      • Creating Credit Notes
      • How Do I Request a Partial Payment or Deposit Payment?
      • How Do I Charge a Guest for Multiple Items on an Invoice?
    • Payment Gateways
      • How Do I Accept Payments Online and Via Credit Card?
  • Managing your Account
    • How Do I Add or Remove My Credit Card?
    • Account Info Overview
  • App Store
    • App Store Billing & Subscriptions
    • App Store Overview
    • App Store FAQs
  • Messages
    • Messages: Spam
    • Messages Overview
    • Messages: Email Notifications
    • Messages: Inbox
    • Messages: Spam Filters
    • Messages: Templates
  • Webready Bookings
    • Webready Calendars Walkthrough
    • Creating Hold Events in Webready
    • Creating a Manual Booking
    • How Do I Delete an Inquiry?
    • How Do I Edit Bookings?
    • Creating a Website Booking Link
    • Importing an External Calendar
    • How do I view my messages?
    • Webready Booking List
    • Making Reservations for Individual Bedrooms
Webready Editor / Booking Settings / Booking Form Settings Overview /
Website Login

Booking Form Settings Overview

Allowing direct bookings on your website is a great way to increase your profits, by avoiding fees charged by OTA's.

To get direct bookings for your Webready website, you must first subscribe to the Booking Engine app from the App Store.

The Booking Form Settings allow you to customize the look and feel of the booking process.

Here we'll take a look at the different Booking Form options.

Booking Form Presets are also available, which allows you to simply select from a list of pre-defined booking form templates. Click here for more on adding a preset.

Navigating to the Booking Form Settings:

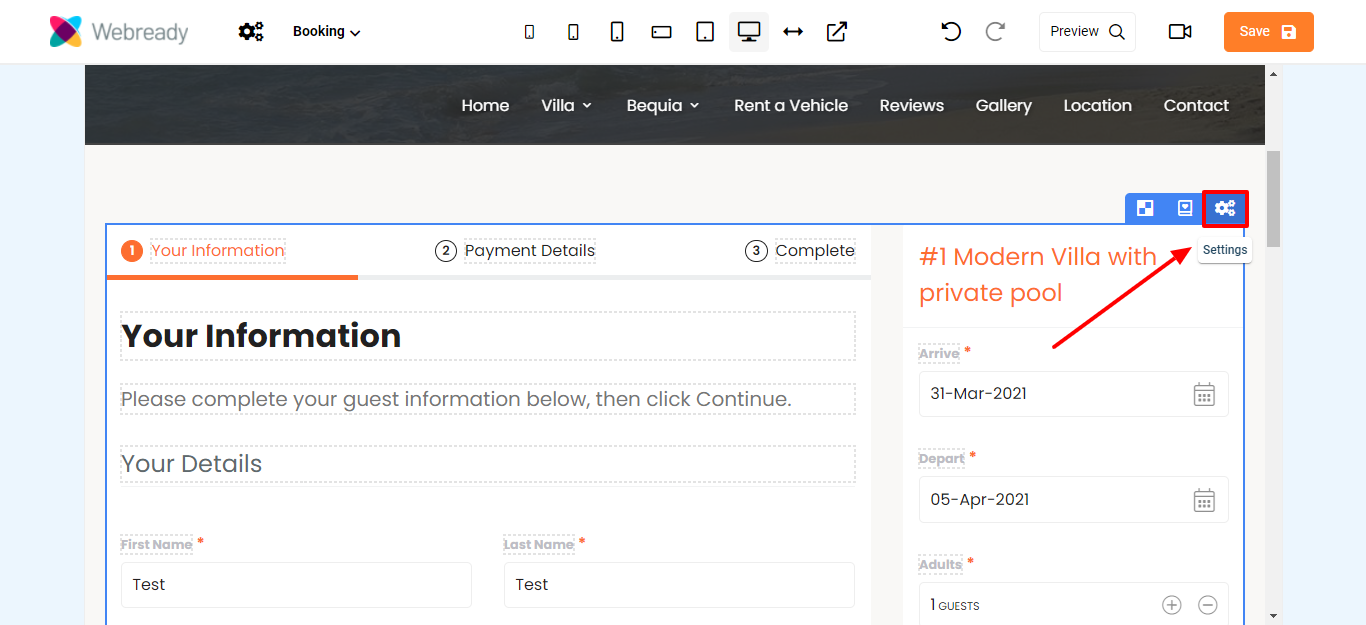
To adjust your Booking Form Settings, you will need to go to the Website Editor and select your Booking page.

  • Select the Booking page

  • Hover over the Booking Form area and click the Settings option

  • In the Settings pop up, you will see various tabs available

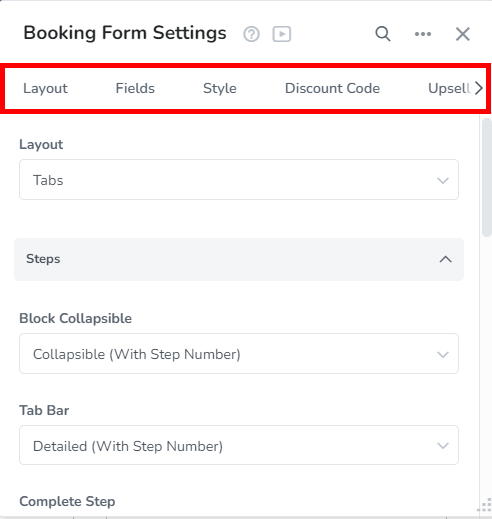
Each tab allows you to make different changes to the booking form. They are outlined as follows:

Layout tab:

Here, you will be able to specify if the booking form steps should be displayed after each other, continuously down the page as blocks, or if each step should show in a separate tab.

Further customization will be possible for the following:

Steps - Choose whether to include a "Complete" step as part of the booking process, which will allow guests to review their information before submitting the booking. You will also be able to select how the blocks or tabs should be displayed.

Booking Form Info - This section lets you specify where the booking form should be placed, and allow you to adjust how the booking dates and guest count input fields are displayed.

Phone Number - Here, you can choose if you will require guests to enter a country code with their phone number or if and how a default value should be added. You can also specify if you will like phone numbers to be validated.

For a full breakdown of the Layout tab, please refer to the article here.

Style tab:

This tab allows you to pick an overall look for your booking form and offers many options to finetune the color used in different areas.

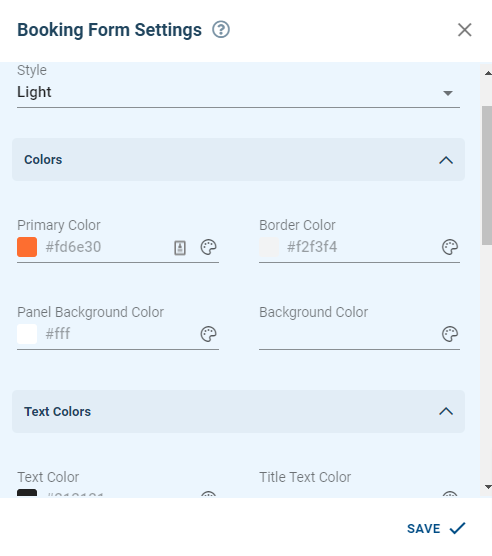
Some of the colors you'll be able to adjust include:

  • Primary Color

  • Text Colors

  • Tab Bar Colors

  • Sidebar Colors

Please review this article for more details on each section contained on this tab.

Discount Code tab:

Choose if to allow guests to enter a discount code and select how it should be displayed. You will also be able to specify where it will be shown.

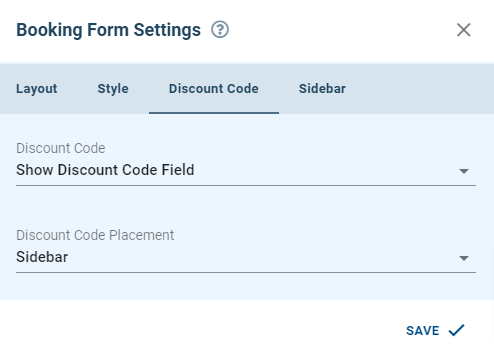
See more details here.

Upsells tab:

Specify if you will be allowing upsells to be shown to guests on your website and if they will be available before the booking is submitted or after. Also, choose how the booking total is displayed once a guest adds an upsell to their booking.

For more details on the Upsells tab, please review this article.

Minimum Recommended Upsells - This allows you to set the minimum number of upsells that will be displayed to the guest in your Recommended For You section of the available upsells.

Maximum Recommended Upsells - Similarly, with this setting, you can choose the maximum number of upsells that will be displayed to the guest in your Recommended For You section of the available upsells.

Booking Price Breakdown - Once an upsell is chosen, it will be displayed along with the booking totals, this option lets you specify if the booking total will be collapsed or expanded by default when an upsell is added.

Sidebar tab:

Customize what the Sidebar title should be, if to show a rental info section as well as the check-in/check-out time zone. You will also be able to choose if the check-in/check-out times will be shown based on the rental details or the guest's timezone.

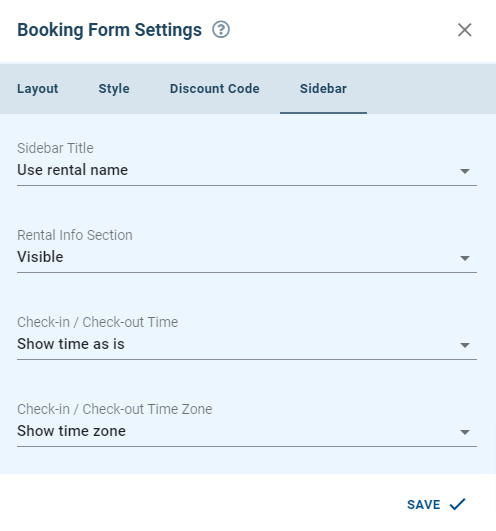
Sidebar Title - Choose whether the sidebar title should automatically display the rental name or custom text that you will enter.

Rental Info Section - Specify whether the rental info section will be displayed. It shows details such as the address, check-in/check-out times and payment terms.

Check-in / Check-out Time - Adjust how the check-in/check-out times will be shown to the guest. It can be shown in the time zone specified within the rental details in Webready or it can show the time in the guest's time zone.

Check-in / Check-out Time Zone - Choose whether to display the time zone for the check-in and check-out times.

Click here to get more information on the settings for this tab.

Rental Instructions tab:

Choose whether the Rental Instructions information for your Rental is displayed during the checkout process on your Booking Form. You can also specify which items you show to guests and where on the form they are visible.

Rental instructions for rental:

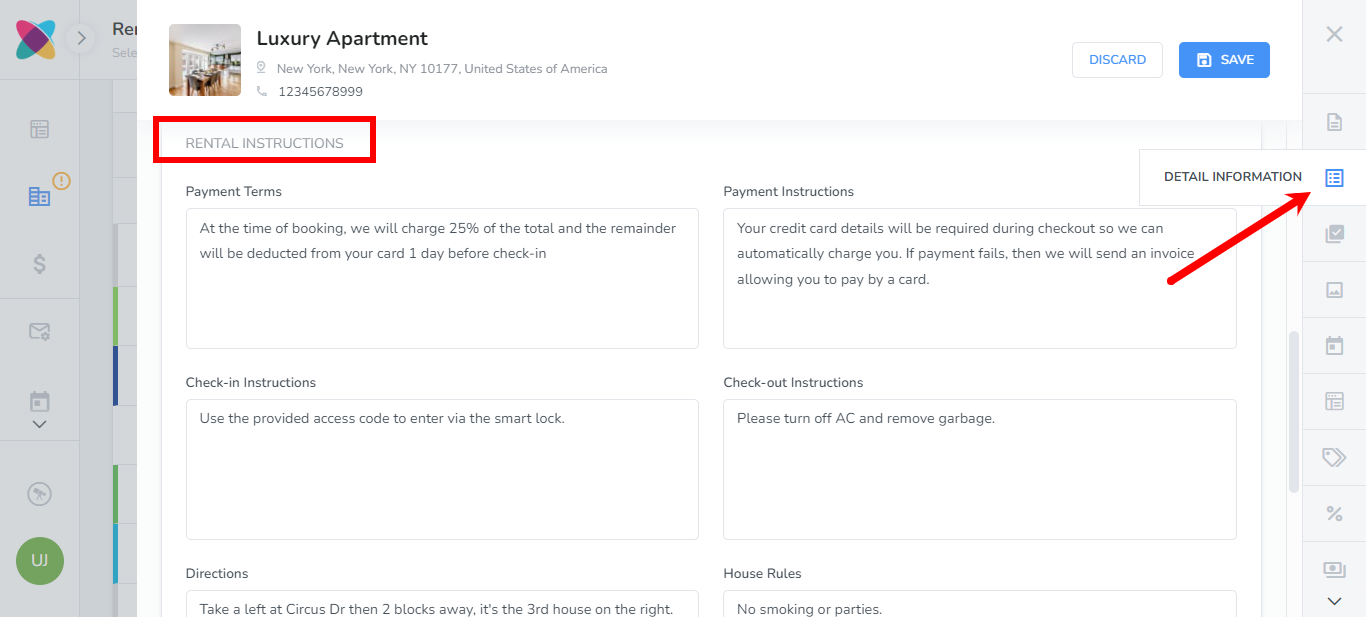
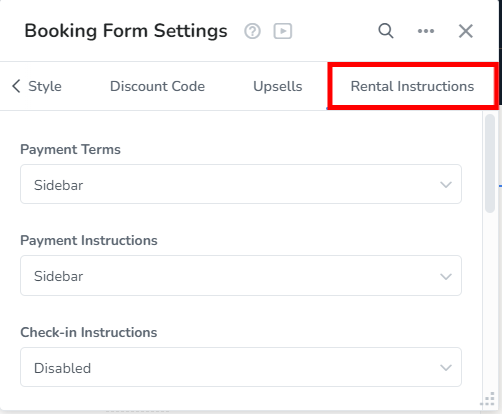
Payment Terms - Specify whether the payment terms from your rental info section will be displayed on the booking form and choose the location that it will be shown.

Payment Instructions - Specify whether the payment instructions from your rental info section will be displayed on the booking form and choose the location that it will be shown.

Check-in Instructions - Specify whether the Check-in Instructions from your rental info section will be displayed on the booking form and choose the location that it will be shown.

Check-out Instructions - Specify whether the Check-out Instructions from your rental info section will be displayed on the booking form and choose the location that it will be shown.

Directions - Specify whether the Directions from your rental info section will be displayed on the booking form and choose the location that it will be shown.

House Rules - Specify whether the House Rules from your rental info section will be displayed on the booking form and choose the location that it will be shown.

Special Instructions - Specify whether the Special Instructions from your rental info section will be displayed on the booking form and choose the location that it will be shown.

Instructions max lines - Choose the maximum number of lines that the rental instructions will be shown on.

Expand instructions by default - Choose whether or not the instructions are expanded to show the full information by default.

Changing the Booking Form View:

The Booking Form View option shows a preview of each possible screen during the booking process. This allows you to view what guests will see at each step, including the success screen or when they receive a booking or payment error. You will also be able to adjust any text to better suit you.

To see the different views available, hover over the booking form and click on the Views icon:

How did we do? Thank you! We appreciate your feedback.
Website Login
Copyright © 2025 Webready. All Rights Reserved.
No documents match your search.
Searching...